Showing posts with label maybelline. Show all posts

Maybelline Lasting Drama Gel Liner Photos


on , ,

11 comments

To date, the Maybelline Lasting Drama Gel liner I reviewed some couple of months ago has been the only gel liner I often reach out for that worked well with my oily, monolids. You might remember my Faceshop felt tip liner horror story... that wasn't much of a good buy for my type of lids.


maybelline gel liner
Immediately after Maybelline gel liner application


I have monolids (can you recall how much I basked in the sea of eyelid tapes and glues) and liner transfer and smearing, whether cream, liquid or gel, are common problems. With the Maybelline gel liner, my only worry is that it mildly smears on the upper part of the lids.

Here are 2 photos taken 4 hours after liner application:

maybelline gel liner smear
mild smearing 4 hours after application


IMG_5963
smearing barely noticeable when I fully open my eyes


My other gripe is that it can be tough to remove. But other than the mild smearing and the stubborn gel during cleansing, I am highly recommending this gel liner to those who have a similar eye type like mine! Maybelline's product topped my previous HG, the Fanny Serrano gel liner, since the former still has a creamy consistency during the entire time I've been using it (7 months).

4U2 Glitz Shimmering Brow Mascara


on , , , , , , ,

11 comments

I love how the 4U2 Glitz Shimmer Brow Mascara works wonders for me! I got the dark brown shade (which looked black to me) which suited me just fine.

I initially wanted to get shade 02, which is brown, since I felt it suited my colored hair better. However, it ended up streaking my brow with this weird whitish color at the tips. But it could've been the tester, i'll sure be back to give that prettier shade a second chance!

4U2 Glitz Shimmer Brow Mascara 01 swatch

4U2 Brow Mascara costs a fraction of a MAC browset. It delivers satisfactorily despite the cheap tag (not as marvelous as MAC's, though). This is available in all 4U2 Cosmetics counters in Watson's and SM Department Stores priced at P 234.00.

Will definitely recommend this to those who can't afford a MAC browset and wants to prettify the face further by enhancing the brows. I often use this after using the In2it or ELF Brow Kit to keep my brows in place but on lazy days, I plainly use a dash of the 4U2 brow mascara on my brows to frame my face.

1: Thick application of the Maybelline Lasting Drama Gel Liner
2: perfect brows to frame the face (thanks to 4U2 brow mascara)
3: after 2 hours on my oily lids... smokey look na
4: effect of 4U2 brow mascara + maybelline gel liner
5: bare face: before Pure Anada Minerals+4U2+Maybelline
6: don't let the shimmers freak you out; not shimmery at all on the brows
7: brow mascara 6.5g, P234; gel liner, P449


Learning to apply the product properly on the brows for makeup newbs will definitely want them to repurchase. I discourage those who do not plan to use this often as I noticed that this brow mascara dries up in the bottle gradually over time.

I love the 4U2 Glitz Shimmer Brow Mascara to bits. It's cheap, effective and definitely something that can revamp the way your face looks!

Maybelline Lasting Drama Gel Liner Review


on , ,

9 comments

I grew tired of heating up my Fanny Serrano gel liner.  Mainly because I actually found a new HG gel liner to replace it with --- the Maybelline Lasting Drama gel liner.  By far, this is the best eyeliner I've ever used based largely on its affordability.

Maybelline's Lasting Drama Gel Liner in Black
449php at Maybelline counters


It has this cute tin screw cap


Not only is it cheap, but the color pay-off is just HG material (see EOTD's here).  You don't need to swipe your brush several strokes just to get your eyes lined dramatically.  Here are some swatches:


Maybelline Lasting Dram Gel Liner swatched once using the free brush


Maybelline Lasting Drama Gel Liner's intense black color (stroked twice)


After being impressed with the color pay-off, I tested if it's really smudge-proof.  Lo and behold, it fairly stayed put after rubbing it with my finger.

Trust me, I've already rubbed it... it just won't come off (although you can already see streaks that go downward)


After using the Maybelline Gel liner for weeks, I knew it's HG material for me.  It never washed off nor smudged grossly during the entire time I wore it (approx 9 hours).  And when my lids got really oily because of the humid weather, the color just lightened a bit.  It never gave me horrific eyes like some liquid eyeliners gave me (remember my Faceshop liquid liner horror story?) 

I've tried to use it on my waterline, too.  It smudged a little at the end of the day, but it was a nice smudge.  Like I had pretty smokey eyes.  

What I loved about it:
  • dries up quick during application (while this may be a con for those who are just starting out with eyeliners)
  • doesn't smudge
  • great color pay-off
  • lasts my oily lids up to 9 hours!
well what do you know....
... it sure lived up to its claims! quick dry, intense color, lasts all day and is smudge-proof!
  • entire tub does not dry up easily (Fanny Serrano gel liner completely dried up after 3 weeks despite sealing it tightly)
  • comes with a free eyeliner brush
  • the packaging fits your purse! really handy
  • affordable and readily available (and at discounted prices, too!)

Uh-ohs:
  • the brush that comes with it is a bit flimsy for my liking; others can get their way around it, though
  • tub is too small

Some tips to enjoy your Maybelline Lasting Drama gel liner:
  • always make sure that you are using a clean brush; never dip a used brush into the product to avoid contamination
  • dip your brush a bit parallel to the product to avoid creating a "black hole" in your pot
  • an eyeliner sealant can reinforce the gel liner's strength in resisting smudging
  • post-care must ALWAYS include (a) tightly sealing the gel liner pot and (b)washing the brush
  • purchase it at an even lower price during Maybelline's frequent sales; I got mine at 20% off!
Maybelline's Lasting Gel Drama is a beauty staple for girls with oily lids like mine.  It comes in brown, too which my friend, Nikki, reviewed.  Check out her take on this great gel liner!


Mineral Makeup+Clinique Wows Me, My Sister and the Camera


on , , , , , , , , , , ,

No comments

I've told you about my boyish sister's transformation several posts ago.  Lara of NARS Shang did her makeup and hairdo and she looked totally stunning.


A couple of months ago, she had an event she needed to go to and we no longer had Lara around.  And so, half-heartedly (i can tell!), she obediently entrusted me to 'transform' her.

Grabbed this pic from her facebook page.  This makeover surprised her friends and they wanted to keep a memento of it.   They even made an effort to create this fancy pic.


This is her on normal days:


With Ate's Makeover (this was 3 hours after the party already and the cheek makeup's no longer visible):

after clinique's toner and moisturizer:
FACE: Clinique's Pore Minimizing Serum as primer on tzone area only
Clinique Superfit in Neutral applied with fingers
EDM Golden Medium in original glo applied with Charm stippling brush
Joppa Full Coverage in Grecian gold (2-3 layers) applied with Charm stippling brush
buffed mineral powders on face using Nichido kabuki brush
Aromaleigh finishing powder in peaches n cream applied with Charm stippling brush
EYES: In2it eyebrow powder using my bleak angled brow brush
Nichido liquid eyeliner (black)
Fanny Serrano curlash
Maybelline Unstoppable Shiny Black mascara
no eyeshadows, i'm still a newbie with it
Freshlook contact lens
CHEEKS and LIPS: Nichido pink blush (forgot the name)
 The Bodyshop Lip and Cheek Tint on lips

It was such a simple makeup that I did considering she was going to a function where practically all the ladies were glammed up.  We had no time to visit the salon and my poor sister was hoping I could help her with her look.

I don't think I failed, did I?


Simple EOTD using 4U2 Gemtone Quad


on , , , , , ,

5 comments


The first beauty blog I've ever read was Nikki's, and ever since that read, I fancied about being a pro with eye makeup. Nikki does an awesome job with her eye tuts. Too awesome that it makes a makeup newbie dream that she can pamper her eyes with a splash of wonderful colors, too!

So I tried prettifying my own peepers using the 4U2 Gemtone Eyeshadow Quad in Moonstone.


I stated that S2 and S3 looked similar on the pan during my previous post, I proved my observation wrong with this EOTD...
And I mentioned, too, that S4 looked horrible, well yes, it did.


Bodyshop crayon concealer in 02 applied all over the lid as a base; also applied on the undereye area
S3 brushed all over the lids using ELF shadow brush
S2 patted on the outer third of the lids using same brush
S1 on the inner corner & inner 2/3 of the lower lashline
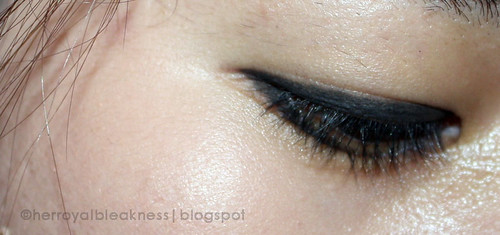
Maybelline Vivid & Smooth Eyeliner in Brown (unsharpened, hence it looked kinda awful)
Maybelline Unstoppable Shiny Black Mascara + lash curler
And as a newbie, I FORGOT to highlight!


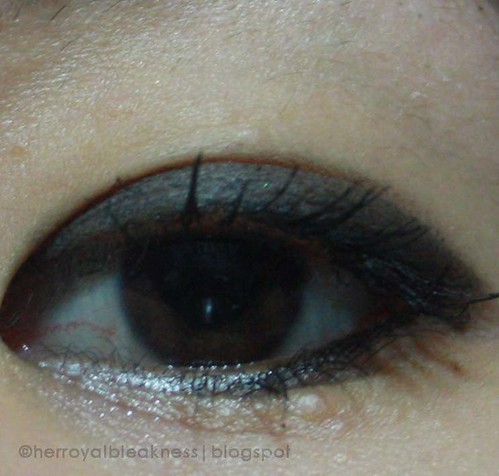
I thought that it looked to strong for my small eyes. And so I painted my eyelids with less color.


A more 'serene' eye. Oh, and I remembered to highlight! Just had to buff and blend well.


Bodyshop crayon concealer in 02 applied all over the lid as a base; also applied on the undereye area
S1 brushed all over the lids using ELF shadow brush
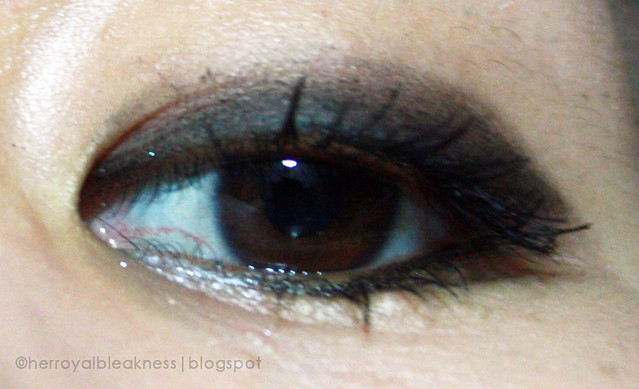
Bodyshop Argyle Pink below the crease using Nichido sponge tip applicator
Bodyshop Imperial Purple on outer 3rd of the lower lashline using Fanny Serrano eyeliner brush
Bodyshop Dusted Silver on the brow bone down to the area between nose and eye using ELF shadow brush
Bodyshop Dusted Silver on the inner corner of eye and on inner 2/3 of the lower lashline using Fanny Serrano eyeliner brush
The Face Shop's pen eyeliner in Black
Maybelline Unstoppable Shiny Black Mascara + lash curler
Fashion21 brow kit


The tools. Gawd, I forgot how to count! 1-2-4-wth?

1. 4U2 Gemtone Quad (P424/$9)
2. Fashion 21 Brow Kit (P100+/$2)
4. old lash curler I need to replace
5. Bodyshop crayon concealer 02 (P600+/$13)
6. ELF eyeshadow brush (P129/$2... it's just a dollar in the U.S., i know)
7. Nichido's sponge tip applicator (set of, erm, 4? or 5? P36.50/75cents)
8. Fanny Serrano short eyeliner brush (P75/$1.50)
9. The Face Shop pen eyeliner in Black
10. Bodyshop's shimmer+sparkle cubes (P1000+/$20)


I only used ELF's eyeshadow brush for these looks (no blending brush or crease brush or whatever... i can't believe it). It is amateur, but methinks I pulled through just fine.

Once I get to buy the other important eye brushes (I'm thinking of MAC 217 and 239) and some fancy lashes, I think I can live up to creating an Askmewhats eye look I've always wanted.

xoxoxoxoxoxoxoxoxoxoxoxox

Madeleine is giving away a $15 Aromaleigh GC. Ooooh, i love their URFP's! If you want in, jump in with me to join her contest!

You, too, Can Get that Ulzzang Look!


on , , , , , , , , , , ,

11 comments

The first time I ran through the shots of the girls sporting the ulzzang (or ullzang) look, I dissed myself for not knowing make-up and stuff as much as I should.

Despite my run-of-the-mill skills in make-up, I pushed myself to watch youtube vids on how to get the much coveted "ulzzang" look. Ulzzang is a Korean term that connotes a pretty face. Who wouldn't want that? And so I ventured...

(thanks, Nikki of Askmewhats for the inspiration)

(Disclaimer: This is my death-defying act with make-up because I badly wanted to TRY the fad... the authentic ulzzang look necessitates circle lenses and falsies... but I don't have those and so I went ahead with what I've got on hand.)

xoxoxoxoxoxoxoxoxoxox

Five Cheap (and easy!) Ways to Get the Ulzzang Look


Ulzzang Look Step 1: Make your eyes magical with double eyelids

My biggest problem is that my left eye's lid is waaay thinner than my right eyelid.

my assymetric lids

I scanned youtube for tuts on creating double eyelids. I made sure I practiced these "lessons" several times till I got used to using an eyelid glue right. Koji Eyetalk is what most of the girls use, but since we don't have that locally, I opted for:

Aido Eye Putti 140PHP (roughly $3)


we glue and poke!

Finally, I now have a better left eyelid!


Ulzzang Look Step 2: Conceal the bags and line the eyes!

A Nichido concealer came in handy to hide my eyebags and dark undereye areas.

I used a black gel liner to line the upper and lower (outer third) lash lines. Then, I used a silver highlighter on the inner lower corner of the eyes (used L'oreal illumination in 915 Highlight Reflets)
Fanny Serrano's gel liner, 220PHP (roughly $ 4.50)

the black liner+white liner tandem widened my eyes


Ulzzang Look Step 3: Apply eyeshadow

I am no pro at eyeshadows. They are the last thing I'd learn to do mainly because it looks difficult. So I just slathered a basic bronze shadow on my lids and highlighted my browbones (used L'oreal illumination in 915 Highlight Reflets). If you can do shadows well, I'd bet you'll be perfectly uzzlang-ish!
Body Shop Cubes Palette, I used Shade 04, Rich Bronze $22

now you know what i mean by hating eyeshadows... i can barely let them appear on my eyes!


Ulzzang Look Step 4
: Apply Mascara and fill the brows

Using light sweeping motions, I filled the gaps in my brows with Avon eyebrow liner (brown).

I used my all-time fave mascara to add that girly touch to my flutters.


Lash curler and Maybelline Unstobble Mascara in Shiny Black, around 300PHP (roughly $6)


Ulzzang Look Step 5:
Finish with light powder and lip balm!

Just to keep the oil at bay, I used Aromaleigh's Ultra Resolution Finishing powder. Add Burt's Bees Lip Balm, and you're all set!

Although the real (and very pretty) Ulzzang look is based on circle lenses and long flirty lashes, I skipped those parts because, one, I have yet to buy those, and two, I haven't found the guts to play around with circle lenses and falsies. Here is my final ulzzang look:


If I can be Ulzzang (even just on the average), then so can you! Go ahead, quit hesitating and start digging up that train case! Try on that Ulzzang look you've long been wanting to do!

Related Posts Plugin for WordPress, Blogger...